Synology Cloudflare DDNS
17 Apr2023
I have a domain that I manage through Cloudflare, e.g. dominikdorn.com. There I have a subdomain that should point to my public IP, e.g. nas.dominikdorn.com .
Synology Scripts
Create the “Update the IP Script”
Put this script into a stable place, e.g. /var/services/homes/domdorn/root/cloudflare_update_ddns.sh
Putting it into a stable place is important to not lose it when you update your DSM.
#!/bin/bash

# Check if the correct number of arguments is provided
if [ "$#" -ne 4 ]; then
  echo "Usage: $0 <CF_ZONE_ID> <CF_BEARER_TOKEN> <CF_DOMAIN_NAME> <IP>"
  exit 1
fi

# Get the input parameters
CF_ZONE_ID="$1"
CF_BEARER_TOKEN="$2"
CF_DOMAIN_NAME="$3"
IP="$4"

# Get the DNS record ID
RESPONSE=$(curl -s -X GET "https://api.cloudflare.com/client/v4/zones/$CF_ZONE_ID/dns_records?type=A&name=$CF_DOMAIN_NAME" \
     -H "Authorization: Bearer $CF_BEARER_TOKEN" \
     -H "Content-Type: application/json")

# Extract the Record ID from the JSON response
CF_RECORD_ID=$(echo $RESPONSE | jq -r '.result[0].id')

# Update the DNS record with the new IP address
curl -X PUT "https://api.cloudflare.com/client/v4/zones/$CF_ZONE_ID/dns_records/$CF_RECORD_ID" \
     -H "Authorization: Bearer $CF_BEARER_TOKEN" \
     -H "Content-Type: application/json" \
     --data "{\"type\":\"A\",\"name\":\"$CF_DOMAIN_NAME\",\"content\":\"$IP\",\"ttl\":120,\"proxied\":false}"Code language: PHP (php)
Make sure the script is executable, by issueing chmod +x /var/services/homes/domdorn/root/cloudflare_update_ddns.sh
Add the Provider to the list of DDNS Providers
Add the following code to /etc/ddns_provider.conf
[USER_Cloudflare_dodo]
	queryurl=https://cloudflare.com/
	modulepath=/var/services/homes/domdorn/root/cloudflare_update_ddns.shCode language: JavaScript (javascript)
Cloudflare Configuration
Get the required parameters from Cloudflare
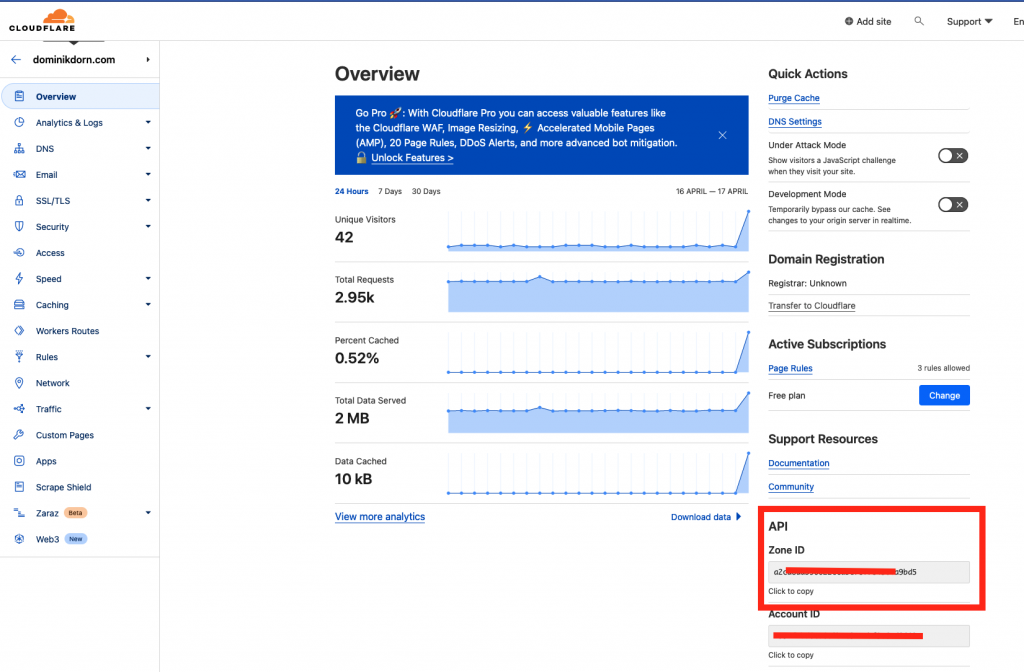
First, login into your cloudflare account, then select the domain you want to use. There copy the Zone-ID

Create an API Token
Next, you need to create a API Token that is capable of modifying this domain. Click on “Get your API Token” or go directly to https://dash.cloudflare.com/profile/api-tokens
There create a new token, select “Custom Token” and configure it as follows:

Token Name: Synology DDNS (or whatever you want)
Permissions: Zone -> DNS -> Edit
Zone Resources: Include -> Specific zone -> your domain name
IP Filtering: Leave blank or specify IP Ranges (if you know them)
TTL: Leave as it is.
-> Continue to summary
You’ll get a screen that looks like this

click “Create Token”
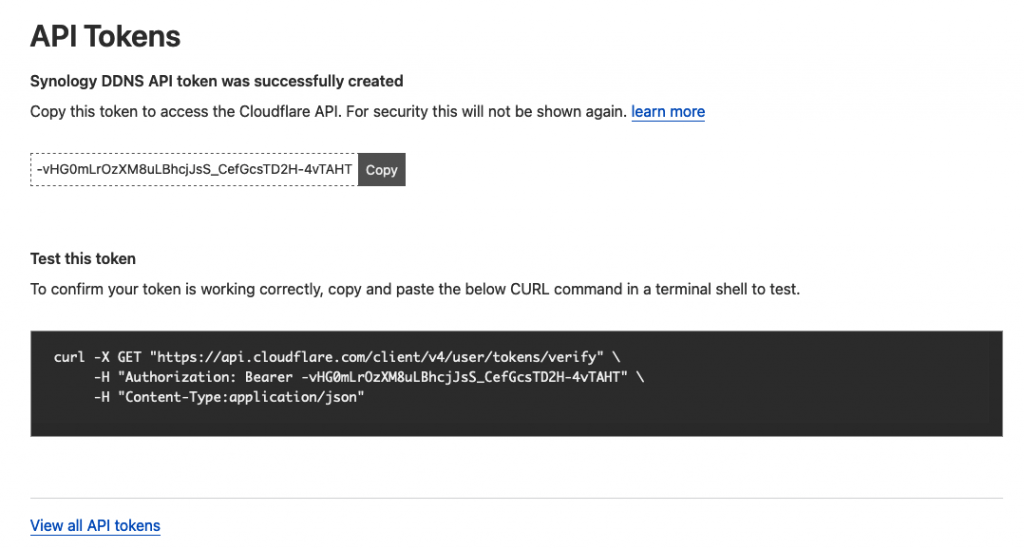
You’ll then get a screen like this

copy the API Token and store it in a safe place.
Create a new record in Cloudflare
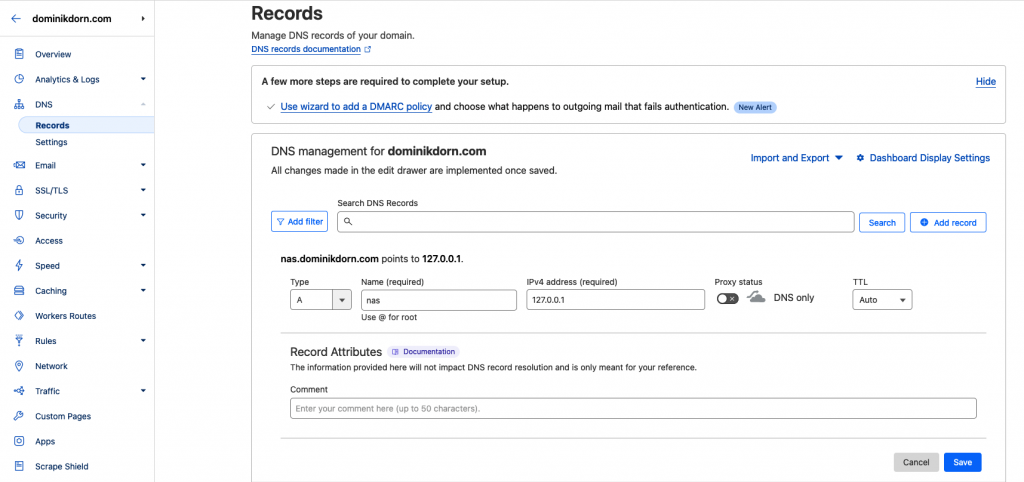
Next you’ll need to create a new record in your cloudflare account in the domain, e.g. nas.dominikdorn.com

Type: A
Name: nas
IPv4 address: 127.0.0.1 (or any dummy ip for now)
-> save
Configuring your NAS
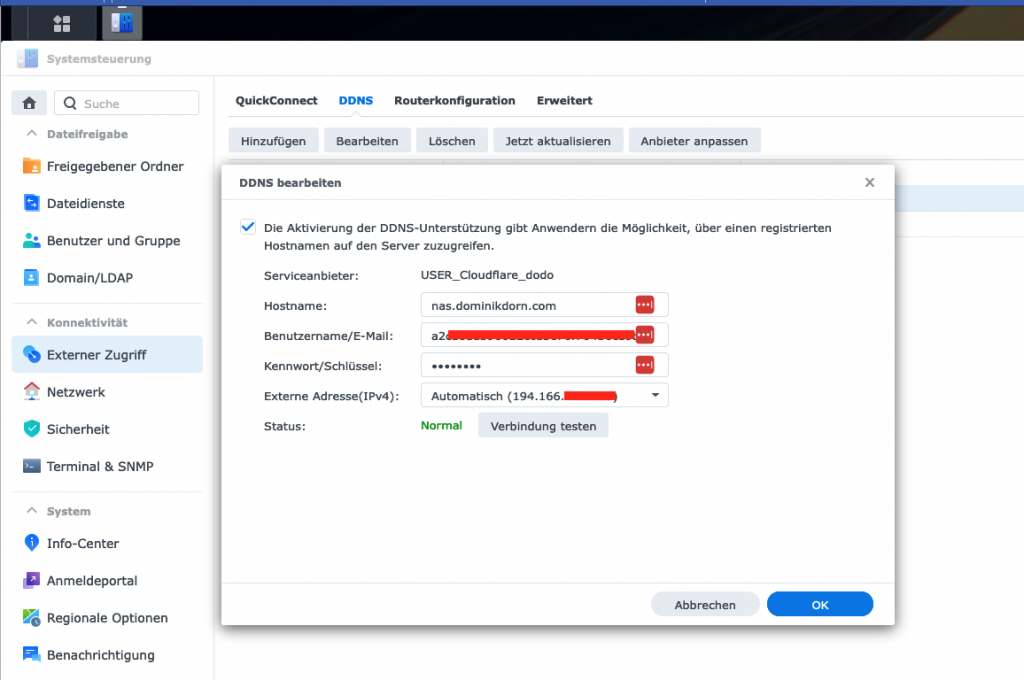
In your Synology NAS, go to System Settings (Systemsteuerung in German), then External Access (Externer Zugriff) and create a new DDNS Provider binding

Configure as follows:
Hostname: the FQDN (full qualified domain name) of your record, in my case nas.dominikdorn.com
Username/Email: The Zone-ID of your domain name
Password/Key: The Token you previously saved
Press “Test connection” and then save the whole thing.
That’s it! Your NAS should now take care of updating your cloudflare hostname whenever the ip changes!
- In: Open Source|Programming
- Tags: DDNS, NAS, Synology